12 Specific examples of video setups
This section contains specific examples about set-ups, recording, and processing options, organized from the simplest to the most advanced. Prior to presenting these ordered examples, we include a reminder about keeping learning outcomes in mind throughout the workflow process of generating remote learning content.
The chapter entitled “Creating and sharing content” described key guidelines to consider when making videos, in order to maximize student learning and engagement.
The learning outcomes should inform the choice of technologies, not the other way around. What do students need to take away from this course? Then decide on the tools you need to accomplish your goals. Keep things simple by using tools that you already have and know, to the extent possible.
You will probably encounter learning curves when creating workflows that are needed to create good quality remote learning materials.
Aligning with the course’s intended learning outcomes: tech in service of teaching
- Set-up: iPad (or tablet such as Wacom), Notability, PPT or PDF (for slides), Blue Yeti microphone, built-in computer webcam
- Content: Video segments chosen according to the course’s intended learning outcomes
- Processing: Camtasia (alternatively: YouTube Studio — learn how, iMovie, or other video editing software) → Export to MP4 → upload to YouTube as public or private → post in Brightspace
Below, we provide examples for approaches for remote learning video construction that include real-time content creation. These examples include:
- Creating a video of handwriting on a blank page (the remote learner’s blackboard…), with video and audio captured using an iPhone 8, to present a brief section of course material,
- Creating the handwriting outcome using purely digital tools,
- Approaches with a bit more sophistication around inlaying the professor’s image inside the image of course slides using a greenscreen,
- An example of a video-based lab demo,
- A high production value video showing what a leading professor can achieve with a team of video production professionals intended to provide a little inspiration.
Example 1 – Handwritten notes
- Set-up: iPhone, stack of books, marker, paper, Make notes ahead of time
- Content: Focus on important points, good pacing, smile, use an engaging voice
- Processing: YouTube Studio to remove undesired parts (learn how), list as public or private, post in Brightspace
Example 2 – Digital handwriting and slides
- Set-up: iPad (or tablet such as Wacom), Notability, PPT or PDF (for slides), Blue Yeti microphone, built-in computer webcam
- Content: Digital handwriting, can correct mistakes
- Processing: Camtasia (alternatively: YouTube Studio — learn how, iMovie, or other video editing software) → Export to MP4 → upload to YouTube as public or private → post in Brightspace
Example 3 – Recording using slides and green screen
In this example, Dr. Elaine Beaulieu describes how she creates videos using a combination of tools.
- Preparation:
- Equipment: Snowball microphone, Logitech HD Pro Webcam (C920), Camtasia editing software, lights and green screen (easy to buy as kits on Amazon)
- Set-up: Videos recorded on laptop using Camtasia software, which captures sound, computer screen and video output. Video camera should
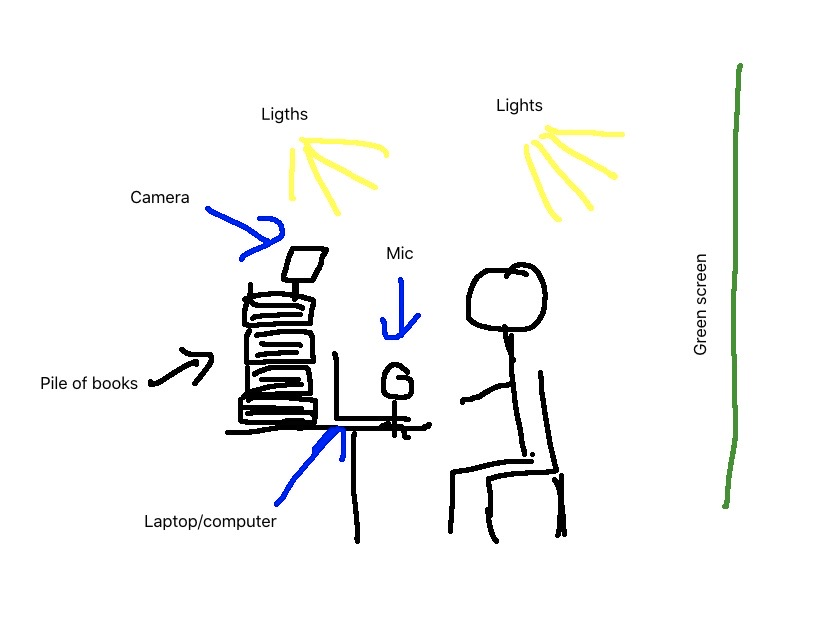 preferably be rigged so that it is slightly above eye level (avoid nose shots). What ever it is you wish to record on laptop screen will work (powerpoint presentation, web based apps or browsing, drawing, etc…).
 - (A note from the Flynn & Kerr: A green screen is optional. It lets you “cut out” your image within a video more easily. It is still helpful for achieving that effect, but video editing software is much more capable than it used to be at correctly identifying the boundaries of a person and clipping out everything outside those boundaries.)
- My green screen is small and only allows me to sit in front of computer to capture my image, I set up lighting for the green screen (even lighting on the green screen helps processing image during editing), but mostly on me.
- Content: Most videos are recorded with at least a minimum of script preparation, but nothing is rehearsed. I don’t rehearse my lectures, so I mostly don’t rehearse videos either, I accept it’s not going to be perfect, but time constraints means “good enough” is totally acceptable.The process may differ for the purpose of the video. Depending whether I am recording an emergency lecture (end of last semester), a blended course video resource or whether I am answering a student’s question.
- Processing: Videos were all edited in Camtasia or Quicktime (a free alternative would be tinytake). All my videos were posted in YouTube. When uploading a video into your account, you can create a playlist for your class, and you can chose who can see you videos : private, unlisted or public. I normally choose the unlisted option for my courses, which means your video would not come up in a YouTube search, but anyone with the link can access it. I specify to my students, in my syllabus and at the beginning of class, that all my teaching material, PPT, videos, activities, etc. are my intellectual property, which means they cannot reproduce it or post it somewhere else or distribute it without my consent.
Example 4a
Here is an example of a lecture. There is little editing apart from moving my image left to right and perhaps zooming in/out. This is a very simple recording, and adding a video of myself is optional, but I add it because I’m comfortable with the tech and because I believe, perhaps wrongly, that my presence on screen is more engaging than screencast alone.
Example 3b
Here is a video recorded for a blended learning class, where students have tasks to accomplish and I am guiding them in learning how to use the software needed to accomplish the task. You’ll notice there is generally more editing to these videos (arrows, text bubbles, zooming in and zooming in/out) than there is in lecturing video. This means the process is more time consuming and demands greater knowledge of video editing:
It is also possible to create short videos that answer specific questions: just make sure you link to them in ways that make both the question and your answer easy for students to see and find.
Example 4 – Laboratory video
Here is an example from Dr. Horace Luong at the University of Manitoba. This example uses a more advanced set-up and editing, so the details can be found in the attached document.
Example 5 – Full production
In this most advanced example, Professor François Chapleau collaborated with an external firm to produce this incredible video. While such production goes far beyond an individual’s editing capacities (unless you are Steven Spielberg, maybe), we did want to show an example of what was possible when working with a team of professionals in the area.
This examples is provided more as inspiration than as a spur for aspiration.
The knowledge, skills, and values that students should measurably demonstrate by the end of a section/module, course, or program.
