11 Using Moodle
Basic Moodle Settings
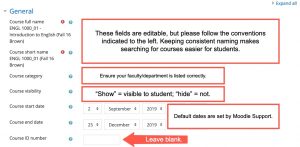
When you first access Moodle, you will see a small gear icon on the top-right of your page that allows you to review and edit the settings for your course as a whole. This Basic Moodle Settings document walks you through some of the most commonly-questioned sections of these settings.
You will see that some things – like your department and faculty – cannot be edited. If you notice an error in a section you cannot edit yourself, please contact Moodle Support.
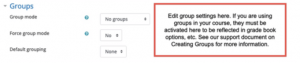
If you are enabling groups in your course, you’ll need to activate them in the general course settings, too. See our document on Creating Groups for more information on how this functionality works.
Importing Content
A few important caveats shape what can and cannot be imported
- You may only import content from a course where you are a Teacher.
- Student data from previous semesters will never be imported.
But all of your Assignments, Quizzes, and other Course Materials can be transferred from course to course, semester to semester.
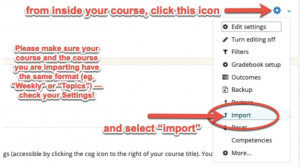
To make formatting your course easier in the long run, make sure both the new course and the one you are importing content from have the same format (see our guide to settings for more information on this).
You will need to start in the course you wish to import content into, and click your gear icon to access the “Import” option.
Next, you’ll be able to select the course you wish to import. Depending on how many courses you’ve taught, this list can be quite lengthy, so you may need to use the search function. Use the course name exactly as it appears in your Moodle dashboard.

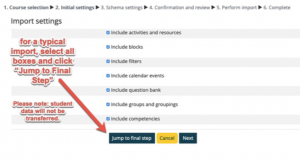
For a basic import with all the content and settings, just tick all the boxes and click “Jump to Final Step.” This process can take a little bit of time, depending on your internet connection and the size of the course being imported.
If you run into any trouble in importing your course content, please don’t hesitate to contact Moodle Support for assistance.
You’ll need to review your course materials and edit them accordingly. (For example, you’ll probably find you have two Announcements pages now – go ahead and delete one.) And make sure you update your Course Outline and any relevant dates and deadlines.
You can print this Importing Course Content document for ease of reference.
Combining Sections
Creating a course meta link allows all the students in one course to be automatically enrolled in another course. You will want to create a course meta link when you are teaching more than one section of the same course and you are using the same course materials and gradebook setup. We recommend creating and adding all students that are currently enrolled in the course to a group before adding the course meta link.
Creating a Course Meta Link
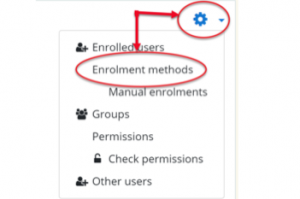
- Click the Participants link located in the left hand navigation menu
- Click the Action menu then click Enrolment methods
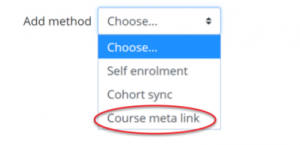
3. From the Add method drop down list select Course meta link
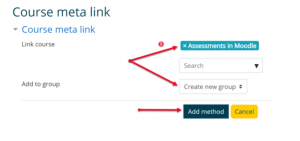
4. Select the course you are linking to from the Search drop down list, select the group you want to add the students to from the Add to group drop down list. If you do not have a group created select Create new group from the Add to group drop down list. Click Add method
You can print this Combining Sections document for ease of reference.
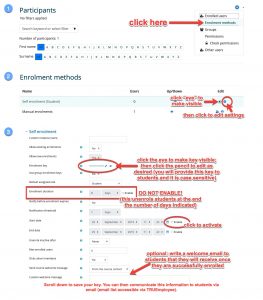
Enrolling Students
Students will be auto-enrolled in your class based on Banner data. You can always enrol additional students or other teachers by clicking on Participants in your left-hand menu and clicking on Enrol Users. If you have a different kind of Moodle Shell that is not linked to Banner, you will need to create a self-enrolment key in order to allow access to your shell. Please follow the steps in this Self Enrolment Key document, summarized in the infographic below.
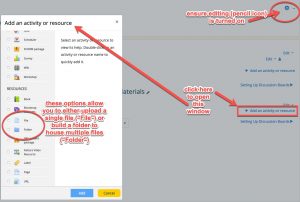
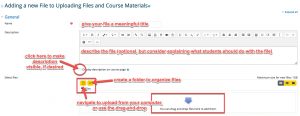
Uploading Files
These resources will walk you through the basics of uploading files to Moodle. Given that we are unsure of what internet access students will have, please keep file sizes as small as possible. Most students will be able to access DOC, PPT, and PDF files, and DOC and PPT files are most accessible for students in need of screen readers or other accessibility tools.
The following annotated images demonstrate how to upload files to your course space.
Please note that all files you upload can be downloaded by the students; it is not possible to make them “view only.”
The following videos may be useful. Note: You will need to be logged on to Moodle to access them:
Allowing Students to Upload Video Assignments
This website provides additional information on File Resource Settings.
Additional Help
Creating Discussion Forums
To keep up communication with students and allow for class discussion, you can use discussion forums.
Forums in Moodle
Asynchronous communication on Moodle is performed through the Forum activity. Forum activities can be made with different formats and settings to facilitate various discussion goals and are, by nature, asynchronous.
All new Moodle course shells are created with an “Announcements” forum which is a one- way communication forum only instructors can post to.
Forums have many uses, such as:
- A social space for students to get to know each other
- For discussing course content or reading materials
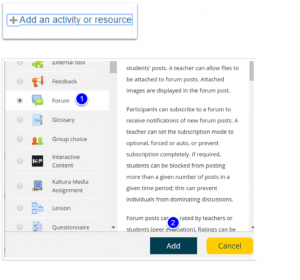
- For continuing online an issue raised previously in a face-to-face sessionAdding other forums is a straightforward process and to create a forum and they can be set up as a graded item as an option. To add a forum, Add an activity or resource, select Forum and click Add.
Forum Settings
Add a forum name, description and consider settings that will meet your needs and link to your gradebook if desired (note that it is important to set up your gradebook first). Done’ forget to Save once complete.

Accessing and posting in a forum
Once created, the forum is accessible under the topic or week you create it in (or move it to).
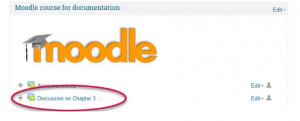
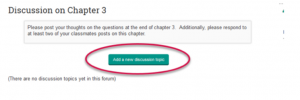
Posting a forum topic
Click on the Add a new discussion topic which opens a posting page where you can add a subject line, message, and attachment. Once one clicks on “Post to forum” they have 45 minutes to edit it before it is shared with all participants. To edit is, simple click on the Discussion topic post to edit as needed.
This “How to Set Up a Discussion Forum” video also provides a useful overview.
You can also find more information on Forum Settings on Moodle’s support site.
Creating Assignment Dropboxes
Assignment dropboxes allow you to easily collect student work. Specifying that students submit files as PDFs will allow you to mark directly in Moodle; otherwise, files can be downloaded for review. This resource walks you through how to set up an assignment dropbox.
How to Create an Assignment Dropbox
When reviewing assignment submissions, instructors can leave feedback comments, upload files such as student submissions with comments, or audio feedback. Assignments can be graded using points, a rubric, or grading guide. Grades entered on the Assignment grading page are automatically added to the Moodle gradebook.
Step 1
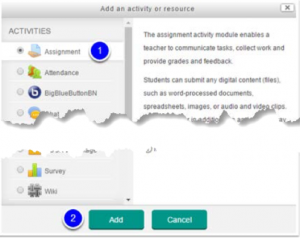
Ensure editing is turned on. Locate the Section where you would like to add the assignment activity then click + Add an activity or resource
Step 2
Select Assignment from the activities list then click Add. The Adding a new Assignment page will open.
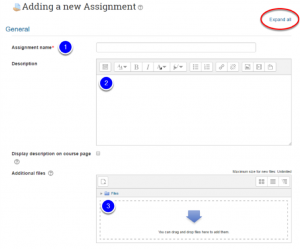
Step 3
Give the assignment a name, in the description area you can explain what the students must submit and you can upload supporting documents in the Additional files area. Expand all opens the topic headings to display their configuration setting.
- Assignment name
- Description Area (Optional)
- Additional files (Optional)
Step 4
Configure the assignment options. Click Expand all to view all the possible settings or click each topic heading to view the settings for each topic individually.
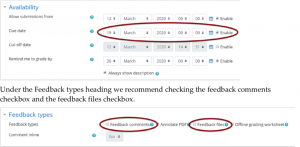
Under the heading Availability we recommend adjusting the due date to reflect when the assignment is due.
Step 5
Click Save and return to course to return to your course or click Save and display to view the assignment. Alternatively, click Cancel to return to your course without creating the assignment.
![]()
You can also find more information on Assignment Activity Settings on Moodle’s website.
You may find the following videos helpful:
How to Set Up an Assignment Dropbox
How to Retrieve, Mark and Return Submitted Assignments
Uploading Final Grades
If you haven’t been using gradebook thus far, you don’t necessarily need to learn it now. You can keep your grades as you have before, but you may find the gradebook a useful tool for simply communicating a final course grade to students. If so, this “How to Upload Final Grades” video may be helpful.
Source
Thanks to the Learning Technology and Innovation Group, particularly Brenna Gray, Educational Technologies Coordinator, for the resources in this section.
